A good braiding hair tutorial will show you how to braid different types of hair. This can include French braid, Upside-down braid, and Fishtail braid. It will also show you how to make the hair tie more secure. Here are some tips on how to braid your hair: First, gather small sections of hair from different sides of the head. Then, cross them over the center.
Simple Box Braid
This simple box braiding hair tutorial will show you how to easily create beautiful box braids with your hair. Before you begin braiding, make sure that your hair is pre-stretched to avoid tangled sections. Then, start braiding your hair from the top and braid your way down to keep it in place.
The first step is to part your hair and prepare it. Use two strands of synthetic hair to make your box braids. Take the two sections that form your box braids and braid them into three pieces. Make sure to braid your hair with straight lines to create the smoothest box braid. Then, use your pointer finger to move the hair from one section to the other. Repeat the process for the remaining three sections of hair.
You can wear box braids down, up, or in the back. You can also wear them loose or in a ponytail. These braids look great with a scarf, and can be worn as a headband or turban.
French Braid
A French braided hairstyle may look intricate, but you don’t need to be a braiding pro or own expensive tools. All you need are a hair tie, a boar bristle brush, and some styling products to complete this look. Once you’ve mastered the technique, you’ll soon be sporting it with confidence.
First, separate your hair into three sections. These sections should be evenly sized. To start your braid, cross the right strand over the middle strand. Repeat this process for all three sections. After that, use the left strand to pull the three strands together. When you’re finished, you’ll have a gorgeous French braid!
The second step in French braiding your hair is to secure the braid with a hair tie. To do this, section your hair at the nape of the neck into three equal sections. Hold the right section in your right hand, and the left section in your left hand. Then, start crossing the right strand over the left one, until the center strand is crossed over the left one.
Next, braid your hair. You can start the French braid from anywhere on the head, but for a tighter braid, start in the center of the head. That way, there will be no visible parting.
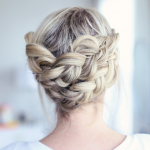
Upside-Down Braid
In this tutorial, we’ll show you how to create an upside-down braid with your hair. First, you’ll need to brush your hair thoroughly. Then, divide your hair into three sections. The first strand should cross over the middle strand, then cross the left strand over the right strand. Next, take the piece of hair from your right side and add it to the braid.
Another great style to try is an upside-down braid bun. This hairstyle can be worn every day or for special occasions. To create the bun, you’ll need to brush your hair, spread a little mouse, and then divide your hair into three strands. Secure with elastics.
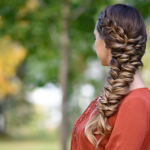
Fishtail Braid
Fishtail braids look more complex than they really are. Compared to the traditional ponytail or braid, they are much easier to manage. Here are some tips to make the braiding process easier for you. First, start by taking a medium-sized section of hair at the crown of your head. Next, divide it into two sections. Using your index finger, gently pull one section to the right and the other to the left. Repeat the process twice. The first braid will be a small fishtail, while the second will be larger.
Make sure to leave at least half an inch of hair free for the braids to remain in place. It is also a good idea to use a dry shampoo or texturizing powder to make the hair more secure. You can also opt for a looser look by pulling out some strands.
Once you have made a fishtail braid, you can add the left section to your braid to create a half-pony. A small portion of the right-hand section of the braid can be tucked underneath the left-hand section. Make sure the braid is as tight as possible, but you can also leave it loose to add some texture later.
Triangular Braid
If you have long hair, try adding triangular braids to your hair for a statement style. You can use several colors to make your hair look gorgeous. This style is best suited for longer hair. You can also add curls for a chic look. Shorter braids can also look beautiful with curls. These braids are easy to create, and they will last for hours. Moreover, you can use different colors to add a little flair to your look.
Triangular braids look very different from square or irregular partitions, and they can be a great way to refresh your look. To learn how to do them, follow a step-by-step tutorial. The braids are made with large triangle boxes, and are kept thick. Depending on the type of hair, you can change the color of the braids and wear them as a crown or a headband.
This style looks best on long, dark hair with natural curls. This style is modern, and it does not require much maintenance. It can last up to three days with minimal care, but you’ll need to take it down after the third day to do your hair again.
Fishtail Braid on Shoulder-Length Hair
A fishtail braid is a stylish way to wear shoulder-length hair. A half-up, half-down fishtail braid creates a chic and versatile style. You can add fresh flowers or greenery to accent your fishtail braid. It is a versatile style that will look beautiful when added to a chignon or an at-home updo.
To create a fishtail braid, start by sectioning the hair at the front and back of your head. You should start with a section about half-inch away from the part. Repeat the process until you reach the end of the hair. Make sure to keep the braid tightly twisted to prevent it from falling out.
Fishtail braids are easier to create if your hair has some texture. If you don’t have textured hair, you can add some texture by curling your hair with a curling iron. A great curling iron is the Drybar The Mixologist Interchangeable Styling Iron ($199). The braid should be made so that the braid drapes over one shoulder.
A fishtail braid on shoulder-length hair is a versatile hairstyle that adds a stylish flair to any outfit. It can be tricky to create at first, but with practice, it will become second nature to you.
Fishtail Braid on Longer Hair
If you have long hair, the fishtail braid is a simple but elegant hairstyle. This braid is made by twisting your hair and tucking the ends under the braid. This hairstyle is perfect for special occasions or a romantic evening. You can even add a decorative element to your fishtail braid for an extra special touch.
Start by braiding a section of your hair closest to the back of your head. Repeat this step until your hair is at its maximum length. Leaving about 1 inch of your hair on the ends will help prevent the braid from looking too messy. You can also use hair ties to secure your fishtail braid.
You can also try a multi-pony fishtail braid to give the illusion of longer hair. This style looks beautiful on shoulder-length or longer hair, and is best suited for darker hair colors or balayage. However, if you have shorter hair, you can also recreate this style with clip-in hair extensions.
To learn how to braid the fishtail braid, you need to know a little bit about hair styling. First, you need to know how to hide ponytails. If your hair is straight, you can add a little texture with a curling iron. A good curling iron is $199, and it will work well with this style. The fishtail braid will drape over your shoulder once it is completed. Using a mirror is helpful in this process because you can see your hair in the mirror while you work.