If you’re looking to learn how to braid your hair, a hair braiding tutorial can help you learn the basics of this popular style. Marc Ross, who has been behind the scenes on editorial shoots, shows how to create a variety of braiding styles. His experience behind the camera will help you learn faster.
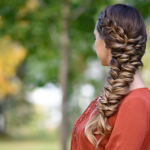
French Braid
A French braiding tutorial for beginners is a great way to learn how to create this popular style. While it looks difficult, it’s actually a lot easier than you might think. The trick is to practice! The more you practice, the more natural the braid will look. This style is also very versatile, so you can use it anywhere!
To begin, separate the hair into three sections. Pull in new hair on each side. This way, you can create a more intricate braid with less hair. You can also start from the nape of the neck, but make sure to include all of the hair there. Once the braid is in place, secure it with a hair tie or elastic band.
To create a French braid, part your hair into three even sections. Make sure that each strand is equal in length and thickness. You’ll then need to braid the right strand over the middle strand. Repeat this process on the other side. Once you’ve finished with the right side, you’ll have a french braid!
Once you’ve secured the first section, you can start braiding the rest of your hair. If you’re working with fine or unruly hair, tease it a bit first to give it extra volume. Then, use a comb or brush to smooth it out. If you have thicker hair, use a leave-in conditioner. This will prevent your braid from stiffening and frizzing.
Five-Strand Braid
To learn how to make a five-strand braid, you need to know how to braid the hair in sections. Start from the top and work your way down. You will end up with a big crown of hair. Next, take a new strand of hair and cross it over the middle strand. Repeat the process to the left and right. You will then bring the right braid to the back of your head and secure it with bobby pins. Once the braid is secure, you can spray hairspray on it to hold it in place.
After completing the first step, you can move on to the next step: braiding your hair into a plait. To do this, you must use a thread. You can also use a comb to help you with this step. If you don’t have a comb, you can use a hairbrush to guide you.
To create a five-strand braid, you need to create a nice rhythm. Once you have a rhythm, it will be easier to braid the hair. You can practice on someone and see how it looks on them. Having a stylist show you how to do this hairstyle will also help you get better at it.
A five-strand braid is more complex than a normal braid. However, it is still possible to make this braid if you have the patience and experience. Arena recommends using Redken products for braiding.
Rope Braid
If you want to learn how to rope braid your hair, the first step is to know how to twist two sections of hair. Then, cross these sections in opposite directions. Then, put two bobby pins over the ends to secure the braid. Finally, combine the braid into a ponytail and tie it with a hair band.
Rope braiding is a common hairstyle that’s easy to recreate. It’s a type of false braid, but it’s really more of a twist than a standard plait. It requires the ability to maintain friction and traction, which means that your braid will hold for a long time.
This hairstyle looks complicated, but it’s actually quite simple. Start by making two small sections at the nape of your neck. Hold the strands lightly, and then twist them counterclockwise around your fingers. You can also braid your hair in multiple sections, if you wish.
Rope braids can also be made on short hair. The misconception that short hair doesn’t work for braids keeps women from wearing braids. A rope braid can be worn with a deep side part. Afterwards, you can twist small pieces into ropes and pin them underneath your bob. If you’d prefer, you can also wear your hair in a ponytail or a bun. Rope braids can easily be updated with colors or accessories. You can make it more fun by adding hair jewelry and hats to your braids.
For a neat braid, it’s important to have thoroughly combed hair. You should also dampen your hair with water to make sections look clean. Once you’re done braiding, you can move on to a traditional braid and tie up the last one to two inches of your hair with a hair tie.
Bantu Knot
Before you start, you need to prepare your hair. It’s important to avoid using heavy hair products that might damage your hair. Also, use a rattail comb or another tool that separates your hair into small sections. This will help you avoid the knot from getting frizzy. Next, apply gel or cream styler to keep it secure. You may also use rubber bands to hold the Bantu knot in place. You can lubricate these bands with oil to reduce friction and snagging.
After you’re done with the tutorial, make sure your hair is clean and dry. Bantus require extra time to dry, unlike braids and twists. Because they are wrapped tightly, air cannot easily pass through. Therefore, they require several days to dry completely. Moreover, they can be difficult to remove from the hair after they’ve been done, so it’s important to wash it thoroughly before you start.
If you have long hair, you don’t need many sections. However, it’s important to note that more sections will result in curlier hair. It may take some trial and error to determine the number of sections you need for your hair type. Nevertheless, once you’ve mastered the technique, you can create different styles with it.
You can also add a little color to your bantu knots. If you’re unsure of the color to choose, consider trying a contrastive shade. For example, you can try a violet hue, which goes very well with dark-colored hair. This would be a great temporary color, or you can go bold and go for a permanent change.
Tied-Back Braid
To create a tie-back braid, you will need a few parts of your hair. First, part your hair in the center, so that you have two symmetrical sections. Then, take one section and twist or clip it aside. Take the other section and brush it away from your face. Divide the three sections into three equal sections. The dividing lines should be parallel to the direction the braid will go. To make braiding easier, tilt your head towards your hands and twist it slightly.
To secure your braid, secure it with rubber hair ties. If you have coloured hair, use one that matches your hair’s color. Alternatively, you can also use bobby pins. Then, you’re ready to add accessories. The finished look is simply a simple way to add style to your hair.
Creating a tie-back braid is a simple task if you have the patience and the right tools. This style is also quick and easy, and will save you a great deal of time and fatigue. After all, braiding 30 horses a night can take a lot of patience and time.
When you’re finished braiding one section, repeat the process with the other section. The second section should be about an inch or two shorter than the first section. You can then wrap the two sections together with elastic to make it look like one braid.
French Braid With Bangs
A French braid is a great way to add extra style to your bangs without overdoing it. This hairstyle is great for medium length and slightly wavy hair, and it can be made even more fun with extensions. This style is relatively easy to master, and only requires a little bit of serum to keep it in place.
To get started, separate your hair into three equal sections. Next, place the right strand over the middle section. Repeat the process with the other two sections. After that, secure the braid with a tiny elastic. Then, divide the remaining strands into three smaller sections. Make sure the braided sections are about the same thickness.
The French braid is a versatile style that can be worn up or down. It works well with bangs, and is very flattering on many face shapes. The side part is subtle or deep, depending on how you like it. This braid is great for special occasions and can make your look more elegant.
The French braid is a popular choice for many people. It can help you keep all of your hair out of the way, especially when you’re performing strenuous activities. It also helps frame your face. However, it’s important to note that this style is not native to France. It has been referred to as “French” by Americans because it is associated with French fashion trends. However, it actually originated in Algeria. It has also been seen in ancient Greek art.