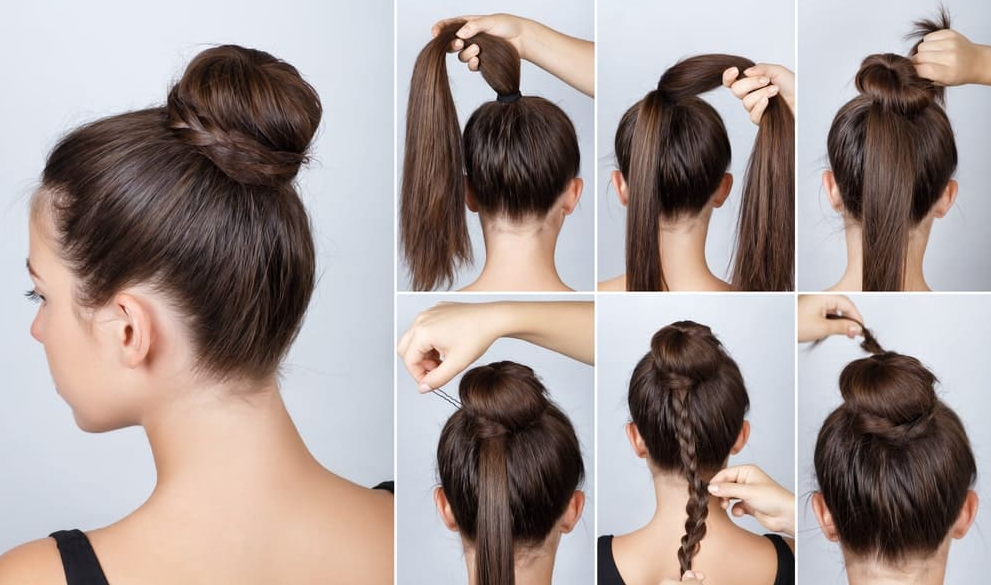
If you want to learn how to tie a ballet bun, then you’ve come to the right place. In this tutorial, you’ll learn the steps to tying a ballet bun, how to secure your bun, and the importance of a sturdy ballerina bun. You’ll also learn how to use a hair net to secure your bun.
Creating a ballerina bun
You can learn how to make a ballet bun in this tutorial. The bun will help you stay balanced while dancing. The right placement will also help you find your center. Many dancers have experience being off-center while dancing and a proper bun placement is important for success. However, there are some things you should know before attempting a bun. Read on for some tips to help you make the perfect bun.
First, make sure you brush your hair clean. You don’t want any tangles. You should also straighten your hair. After that, you should wet your hair with water to smooth it.
Steps to tying a ballerina bun
A ballet bun is a flat bun with a number of pins. These pins help to hold the bun together. In addition to the pins, you can also use hair nets to catch any stray hairs. To tie a ballet bun, follow the steps below.
The first step is to twist the pony tail. Once the pony tail is twisted, you should then wrap a hair net around the bottom of the bun. Now, wrap the hair net around the bun, pulling it upward towards the forehead. Twist it again, and repeat the process.
Importance of a durable ballerina bun
Having a durable ballet bun is essential for ballet dancers. The bun helps with balancing and spotting, and it contributes to a lift-up feeling. Ballet can also seem rather strict and regimented, so buns are an opportunity to add a little personality. They can be embellished with scrunchies, jewels, or flowers. They can even be braided. These are all great ways to express yourself and show off your skills.
When choosing a gel for your ballet bun, it is important to consider the quality of the product. This will determine how long it will last and how well it works. You don’t want to buy a cheap gel and then have to keep buying it for a long time. Ensure that you read reviews and do your research.
Using a hair net to secure a ballerina bun
One of the most effective ways to secure a ballet bun is by using a hair net. First, wrap the hair net around the bun, then pull it up toward the forehead. Then, twist it and bring it back down to the bottom. Repeat this process about three to four times depending on the size of the bun. Once the net is wrapped around the bun, a hairspray can be applied to the bun for added hold.
Using a hair net is a more secure method than using bobby pins. The hair net should be the same color as the hair that is being bunned. This will prevent the fine hair from flying away while preserving the shape of the bun.
Using a curling iron to create a ballerina bun
Using a curling iron to create an elegant ballet bun requires a few steps and patience. It’s important to follow the directions carefully and avoid causing too much heat to your hair. Once you’ve created your bun, mist it to prevent flyaways.
The first step is to brush out your hair and detangle it. Next, use a flat brush to dry it. Once your hair is dry, use a curling iron to add some texture and volume. You can also use a curling iron with a 1″ setting to create more volume. Once you’ve finished curling your hair, take it one step further by twisting it back into a ponytail and holding it in place with bobby pins.